Sunday, October 26, 2008

CAMPING

Camping

                Personally I love the outdoors, though I probably don’t need to say that because its already known… considering I write in a blog labeled Sporting Outdoors.  One of the most popular ways and easiest ways to enjoy the outdoors is through camping.

                Camping or Camp is defined in Webster’s dictionary as,

intr

ansitive verb

1: to make camp or occupy a camp2: to live temporarily in a camp or outdoors —often used with out3: to take up one's quarters : lodge4: to take up one's position : settle down —often used with out<camp out in the library for the afternoon>transitive verb: to put into a camp 


I will discuss the first part of the definition “making and occupying a camp”.  One of the main things to think about when going camping is what you need to bring.  This depends largely on what the weather is going to be like in the area that you plan to camp in and the terrain that you plan to camp in.

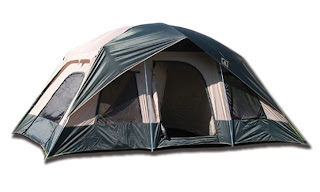
                The first piece of gear to look into is a tent; find one that will fit your needs.  If you are to be camping with a large family all in one tent then naturally a larger tent will be ne

eded.  However the larger the tent the less it can withstand.  If you’re going to do a little more rigorous camping then a one or two man tent is the better choice.  These tend to be built a little sturdier and will be able to with stand a larger beating.  Another upside is that they are much lighter.  This is because they usually have aluminum tent poles unlike the larger tents that use fiberglass.  Below are pictures of the two mentioned tents. 


The next thing on the list is dressing for the weather.  A lot of first time campers will go out and buy the most expensive gear out there.  However they never stop to think that for centuries people have been surviving in the outdoors without a $500 North Face jacket.  And how did have people doing this I might ask?  The answer is…Layers!  What I mean by this is that when you layer clothing such as throwing on two tee shirts will keep you warmer then wearing an article of clothing that is the thickness of the two tee shirts put together.  This is because the air that is trapped between the two shirts acts like insulation just like the insulation that is between the interior and exterior walls of your home.  Though just because layers may keep you warm they will not necessarily keep you dry.  In this aspect our resources have improved.  The outer shell or your clothing should be a synthetic tightly woven fabric.  This will keep out the wind and rain. 

                If your feet are unhappy then you will be unhappy.  It is very important to make sure that when you go camping you bring with TWO comfortable pairs of shoes, one pair that you will use as your main pair and the other pair to ward off Murphy’s Law.  that is that, if you only bring one pair, they will get wet, burnt, a shoelace will break or all of the above (shoes could get wet so you dry them by the fire, forget about them then they light on fire when they’re on fire the laces burn and break and you have nothing to put on your feet…yes it has happened to me).  If you are going to be doing a lot of hiking through the woods get a pair with some ankle support, if it is all well beaten paths then regular tennis shoes will be fine.  If you are going to go out to buy a pair, make sure that your camping trip is not the first time that they are put to the test.  Any time I buy a new pair of shoes I make sure that they are very well broken in before the trip.  I buy them at least a month in advance and make it a point to wear them every day before the trip.  This makes sure they are broken in and if there are any problems with them it gives you time to return them and get a different pair.

(TO BE CONTINUED)


Saturday, October 18, 2008

Building A Sleigh


Christmas is coming up and that means snow.  With snow comes… Sledding!!!  And what better way to go sledding than with 10 of your closest friends piled atop of a sheet of plywood?  This blog entry will be centered on how to build a “Super Sleigh” that may be used to barrel down a hill, tow behind your jeep in a parking lot, or anything else you’re crazy enough to try. 

                Start with a trip to home depot.  You will need to get the following, a full size sheep of plywood, five full size 2x4s, enameled spray paint, wax (sex wax works best), 2” screws (or 

a size close to that), and washers that will fit the screws.  It’s not necessary to buy really high grade materials, though it is helpful to have at least three straight 2x4s this helps the sleigh go straight and fast.  When you get home set aside the three straightest 2x4s these will be your runners.  Take the remaining two pieces and cut them into eighteen equal length pieces.  These pieces will be the spacers for the sleigh and three of them will be cut to be the leading edge of the sleigh.

                Now time to “finish” runners.  If you own a planer this is very very easy, just run each 2x4 through till you have a smooth side.  If not, it’s no big deal it just takes a little longer, just sand one edge of each runner till they’re smooth.  I would advise putting a fillet on the edge of your runners using either a handheld router or you could use sandpaper.  This will make the sled faster and make it run straighter.  Next spray each runner with the enameled spray paint that you bought.  The more coats that are put on the better.  After this is done the wood will be slightly rough so just take some sand paper and sand out the bumps, the next part is my favorite.  Wax the runners with the wax that was bought. Then use wax paper to smooth the wax out.  If possible use a torch and LIGHTLY/CAREFULLY go over the runners to melt the wax evenly.  At this point your runners should be protected from snow and ice as well as smooth as glass.


Next take the eighteen pieces that were cut and pile six next to each runner.  After doing this take one of the runners and its six spacers and set them out in a space that you will be able to work in.  Lay out your spacers like this, two at one end of the 2x4 (all the way op to the end of the wood) two in about the middle and two about one foot from the other end.  Grab 

your screws and screw the blocks into the runners, make sure that you are screwing them into the unfinished sides of the runners.  Screw them in in layers, and use three or four screw per block.  I know it sounds excessive, but if your sled starts to go sideways there will be A LOT of stress on these joints and they will rip right apart, leaving you with a broken sled and runners with screws sticking out of them.  Once this is done cut a curve at the front of the runner this curve will prevent the sled from getting jammed in the snow.  Smooth out your cut with sand paper then repeat the entire step with the other two runners.

Now that the runners are done it is time for perhaps the most important part, the decorating/ painting of the sleigh.  Use the spray paint or anything else you have laying around to 

decorate or color one side of the plywood.  If you’re looking for an idea just look at the pictures of mine.  Once the decorations are complete, screw the plywood on top of the evenly spaced runners using the washers to prevent the screws from pulling through the plywood.  The final touch is to drill two holes in the front of the sleigh for a tow rope.


Saturday, October 11, 2008

Cleaning a Shotgun

Cleaning a Shotgun        

                Well goose season is right around the corner, and with that comes an important process, loved by some, and dreaded by others.  A shotgun is a tool, and like all tools they work best when well maintained and are cleaned frequently.  Since for some of us this fall may be the first time in about eight months that our shotguns have been exposed to the basement light, I figured that I would go through how I at least clean a shotgun.  I say this because though there is a basic order of events when cleaning a weapon, there are always things that each person does differently. 

                I personally own a Remington 870 3-1/2” magnum so I’ll go over the steps to cleaning a shotgun.

First push in the release pin in that is on the outside of the trigger guard.  Then slide the pump half way down the magazine (if the breach is already open then you will simply have to slide it forward).  Doing this makes it much easier to remove the barrel of the shotgun.  After this is done, unscrew the end cap of the magazine.  Then take a flathead screwdriver and stick it in the magazine, push down and rotate counter clockwise.  This should release the spring in the magazine.  Pull out the spring and plug and set them aside.  The barrel should then slide right off the rest of the weapon.  Now for the tricky part, slide the pump forward, exposing the inside of the action.  When this is done a rectangular piece will come out with the pump, set these both aside.

                For this next part I find it easiest to hang the shotgun upside down over a trashcan.  Upside down so that all the fluids run throughout the entire weapon, and over the trashcan for obvious reasons.  I then use a degreasing agent to remove all of the dirt and grime that is inside the action.  While the action is drip drying, I move on to the barrel.  I start with a wire brush made of brass.  When cleaning the barrel of the gun, you should ALWAYS use a metal that is softer than the barrel. If it isn’t, the barrel of your shotgun will be really scratched up, and possibly change the flight path of the pellets.  Run the brush in and out of the barrel a few times to loosen/remove the larger particles of grime and gun powder.  I then spray the degreaser down the barrel, this will loosen/remove the smaller particles in the barrel.  I leave the barrel to drip dry and go back to the action of the weapon. 

                The action of the weapon is now almost completely clean.  I use WD-40 with the straw to force out the rest of the dirt, then I use the degreaser to remove the WD-40 (WD-40 attracts dirt),  I re lubricate the action with 3in1 oil.  It will lubricate better for longer and it will not attract as much dirt into the weapon. This important because as the gun is fired and shells are ejected, powder is released throughout the weapon and if the WD-40 was there it would attract it like iron particles to a magnet.  The action is now finished and it’s time to move back to the barrel.

                I spray the inside of the barrel with WD-40 use a bore mop to clean the inside of the barrel.  This will remove all of the left over powder and leave the barrel “squeaky clean”.  Now clean the rectangular piece that came out with the pump should be cleaned with 3in1 oil.  The weapon may now be reassembled. 

                The hardest part is sliding the pump back into the action.  You will need to push in the two pins that are inside the chamber.  These are the pins that keep the pump attached to the weapon, however they also make it a pain in the A** to slide the pump back in. 

                The rectangular piece that came out with the pump needs to be placed back on the pins, make sure that the piece is going in the same way that it came out.  Once you finagle with the pins enough and get the pump reattached you may put the spring back in the magazine and the cap back on.  There may be excess oils on the outside of the weapon and this would be a great time to wipe them off.  The shotgun is now clean and “Ready to Rock N’ Roll”.

Sunday, October 5, 2008

The Jeep "Like nothing else"

The Jeep 
“Like Nothing Else” 
I’m not completely sure if this would be considered an outdoor sport but the way I see it its close enough.  What better way to get from point A to point B than in a Jeep?  Well in the world of outdoor sports, the answer to this question is that… well there really isn’t a better way.  The jeep is the ultimate off road machine.  It has been given the name “hummer recovery vehicle” for a reason.  The truck is light weight and comes stock with wheels large and wide enough to off-road with.  I’m also near certain that it is the only and if not, one of the only stock trail rated vehicles on the road.  
I personally own a 1999 Jeep Cherokee Classic it is amazing, I have driven that truck to hell and back not once having any major problem with it.  Not once have I gotten it stuck, unlike my dads Chevy Silverado, and the mechanical relay for the four wheel drive is so much better than the electrical relay systems.  Yes I have had the occasional problem with an electrical relay here and there or just recently I realized that I had screwed up the front end universal; however through all of that, it keeps on running.  I have done everything in that truck; from tearing through the woods to drifting in four wheel drive to pushing it to 113 mph on the expressway.  It has 130,000 miles on it now which is fairly young for this truck.  My uncle has one and he has me beat with 250,000 miles on it.  I would be interested to hear of anyone with a eep that can top it.  Just comment and leave your mileage and a short message if you wish. 

Climbing Ropes

When rock climbing your rope is quite literally your life line, it is the one thing that, when you fail, it will be there, it holds no grudges and will never lose focus (unlike any human) most climbing ropes are rated to hold a weight in excess of two greyhound busses.  In fact, when climbing the weakest piece of equipment is the human hip.  It will break and/or tear apart before any piece of your climbing equipment.  A climbing is made in two separate parts, the inner core which support 2/3 of the entire weight of the rope and the outer sheath or wrap which supports the left over 1/3 of the weight.  
Almost as import as having the right equipment is the care of your equipment.  Equipment should be stored in a dark dry place, away from dirt, sharp objects and debris.  Your rope should never be walked or trampled on, and it should never be used for anything other than climbing.  Activities that would retire a rope include but are not limited to, towing, using to wrap wood, using under water, and tying down a trailer or other such object.  A way to find out if your rope has been compromised is to take it by one end, fold it and then run the entire rope through the fold; if the rope folds over to easily then it has a tear in the inner core of the rope.  At this point you should cut the rope at this spot, fuse the end if the ropes using a lighter, then keep on checking the rope.  If the entire length of rope is needed you may tie a fisherman’s knot to re attach the two pieces.  
Fortunately devices have been manufactured to help climbers with the problem of keeping their ropes in good condition.  There are stuff sacks that the rope is just stuffed into and the end of the rope is left hanging outside of the bag.  This allows for the rope to be simply pulled straight out of the bag and it won’t become tangled.  If you wish it is also acceptable to just coil the rope and throw it inside any old bag you have laying around, assuming it is clean of course.